One of the community members over at POGS just mentioned that the new ODROID-XU is now available form Hardkernel. Check it out here: http://hardkernel.com/renewal_2011/products/prdt_info.php?g_code=G137510300620
Quite the beefy little ARM unit hosting the new Exynos 5 with 8 cores (4 usable at a time). Essentially it switches between 4 cores that are for light tasks and 4 which are for heavy tasks. Not sure if it's possible to use them all at once, haven't looked into this yet. The whole switching thing is ARM's "big.LITTLE" trademarked design in an attempt to be more energy efficient on mobile devices. The GPU is compliant with OpenCL 1.1 embedded platform profile.
I'm having a serious battle with myself over if I should get it or not. I currently have the ODROID-U2, however, I would like to get my hands on this one because of the GPUs OpenCL 1.1 compliance, albeit only embedded profile as opposed to full. It would allow me to test some OpenCL code I've been playing with for BOINC on an ARM based device.
The problem is that I'm in no position to throw money at new toys. Oh, what to do? Maybe I should wait for something in the same class packing a GPU with full profile OpenCL 1.1 support.

Saturday 3 August 2013
Thursday 27 June 2013
CyanogenMod 10.1.0 Stable for ODROID-U2
I don't know if it's pre-exam jitters or what, but I felt compelled at 3AM in the morning to put together a little instructional on how to get latest CyanogenMod build on the ODROID-U2. Stable was just released a couple days ago. What follows is by no means "complete". Just documenting as I went more than anything.
Note: Assumes we're installing onto an SD card.
Adjust method below depending on your platform.
1. Download
$ wget http://dn.odroid.com/Android_Beta_1.6/U2/OdroidU2_SD_image_25-Apr-2013.zip
2. Unzip
$ unzip OdroidU2_SD_image_25-Apr-2013.zip
3. Dump to SD card.
$ sudo dd if=ODROID-U2.img of=/dev/<replace me> bs=4M
4. Insert SD card into ODROID-U2 with keyboard and mouse and boot.
1. From a browser instance download these:
CyanogenMod 10.1.0 - http://get.cm/get/jenkins/32376/cm-10.1.0-odroidu2.zip
Google Apps 4.2.2 - http://goo.im/gapps/gapps-jb-20130301-signed.zip
2. Open up a terminal, become root and reboot into recovery console:
$ su
# reboot recovery
3. You should be in recovery console when you navigate to do this (in order):
- Wipe data/factory reset
- Install zip from sdcard
- Choose file
- Browse to Download folder and select cm-10.1.0-odroidu2.zip
- Choose file
- Browse to Download folder and select gapps-jb-20130301-signed.zip
4. Now reboot and we should be done. You should get CyanogenMod logo spinning like this for a little bit before Google Apps config appears:

I'll be back to update this later as there will probably be a few bugs to nut out.
Note: Assumes we're installing onto an SD card.
1. Prepare the SD Card
This to be done from a machine with an SD Card reader. We're dumping the 4.1.6 beta image from HardKernel as we want to use the CWM recovery tool to update to CyanogenMod's latest release.Adjust method below depending on your platform.
1. Download
$ wget http://dn.odroid.com/Android_Beta_1.6/U2/OdroidU2_SD_image_25-Apr-2013.zip
2. Unzip
$ unzip OdroidU2_SD_image_25-Apr-2013.zip
3. Dump to SD card.
$ sudo dd if=ODROID-U2.img of=/dev/<replace me> bs=4M
4. Insert SD card into ODROID-U2 with keyboard and mouse and boot.
2. Update the ODROID-U2
Now it's time to prepare the ODROID-U2 for latest CyanogenMod release. Might as well jump to my blog post from the ODROID-U2 itself to click the links for easier download.1. From a browser instance download these:
CyanogenMod 10.1.0 - http://get.cm/get/jenkins/32376/cm-10.1.0-odroidu2.zip
Google Apps 4.2.2 - http://goo.im/gapps/gapps-jb-20130301-signed.zip
2. Open up a terminal, become root and reboot into recovery console:
$ su
# reboot recovery
3. You should be in recovery console when you navigate to do this (in order):
- Wipe data/factory reset
- Install zip from sdcard
- Choose file
- Browse to Download folder and select cm-10.1.0-odroidu2.zip
- Choose file
- Browse to Download folder and select gapps-jb-20130301-signed.zip
4. Now reboot and we should be done. You should get CyanogenMod logo spinning like this for a little bit before Google Apps config appears:

I'll be back to update this later as there will probably be a few bugs to nut out.
Sunday 16 June 2013
SETI@Home v7 Raspberry Pi Success!
Looks like the job finally finished and returned valid:
http://setiathome.berkeley.edu/result.php?resultid=3029125497
Took ~10 days to finish.
http://setiathome.berkeley.edu/result.php?resultid=3029125497
Took ~10 days to finish.
Wednesday 12 June 2013
SETI@Home v7 Project binaries update
When I initially uploaded the project binaries for the new v7 client, I neglected to keep the v6 client included. I forgot that the v6 client is still being used for Astropulse. I've now fixed this and if you download, extract and restart, you should see two application versions instead of just one:
$ boinccmd --get_state | grep -A 8 "Application versions"
======== Application versions ========
1) -----------
application: setiathome_enhanced
version: 6.12
project: SETI@home
2) -----------
application: setiathome_v7
version: 7.01
project: SETI@home
Task still chugging along:

$ boinccmd --get_state | grep -A 8 "Application versions"
======== Application versions ========
1) -----------
application: setiathome_enhanced
version: 6.12
project: SETI@home
2) -----------
application: setiathome_v7
version: 7.01
project: SETI@home

Thursday 6 June 2013
SETI@Home v7 client for Raspberry Pi
MarkJ reminded me that SETI now have a new client which means the old v6 client will discontinue to work.
I've compiled the new v7 client. Go get it over on my project page or download project package directly here:
https://github.com/dcarrion87/boinc-rpi/blob/master/bin/setiathomev7-armv6l.tar.gz?raw=true
As always, with my packages, this just needs to be extracted into the BOINC project folder. If you already have SETI attached you should only need to fix permissions and restart client for it to read new app_info.xml file and start giving you v7 tasks.
My task won't finish for a while so can't let you know if it works yet. However, it's available for those that want to give it a crack.
Current task pending completion: http://setiathome.berkeley.edu/result.php?resultid=3029125497
Not long to go now (Ha ha):

Monday 4 March 2013
School starting.
Thought I'd post something to let people know that semester 1 classes begin tomorrow. This means I won't be able to dedicate as much time to my "toys" and hence the content updates on the blog will most probably suffer.
I'll be continuing to watch things and might post now and then. If you have any requests or suggestions for porting BOINC apps over to a certain platform feel free to post and I can try have a look into it when I get a chance.
My PSU Project.
I decided that it was time to set up a cleaner, more permanent solution for providing 5V and 12V in my server rack. Here's some photos with details outlining where I'm at so far.


4 x 20A rated terminal blocks. 2 of them are for +5V and +12V. The cable I used is auto stuff rated for 10A. I split common ground (GND) over 2 terminal blocks so I don't overheat cabling. Also saves device cabling from reaching.

Rear shot of where terminal blocks are secured in rack.


550W ATX PSU with +5V, +12V and GND feeds. The PSU is getting 240V straight from my UPS (to the left). Those terminals off the feeds are high quality gold plated banana type terminals with plastic covers.
I need to clean up the wiring a little bit. A few additional things to do:
- Get 10A in-line fuses for +5V and +12V. Although PSU is current limiting (shuts off when over current), I really don't want to get to this stage.
- Put a permanent resistor on the +12V circuit. Although I'm constantly pulling something of +12V, I noticed very weird behavior on the +5V when there is nothing doing so. I believe this is related to the PSU needing current draw on +12V in order to function properly.
- Get a cover for the terminal blocks and some sort of support for device cabling.
- More cable clean-up.
- Shunt for reading current draw on +12V and +5V circuits.
Saturday 23 February 2013
SubsetSum@Home for the Pi
I had a request to try port SubsetSum for Raspberry Pi (ARMv6l). I've managed to get it done.
You can find the project files over on my Raspberry Pi project page or use this direct link:
https://github.com/dcarrion87/boinc-rpi/raw/master/bin/subsetsum-armv6l.tar.gz
Successful task completion:
http://volunteer.cs.und.edu/subset_sum/result.php?resultid=1345268
You can find the project files over on my Raspberry Pi project page or use this direct link:
https://github.com/dcarrion87/boinc-rpi/raw/master/bin/subsetsum-armv6l.tar.gz
Successful task completion:
http://volunteer.cs.und.edu/subset_sum/result.php?resultid=1345268
Thursday 21 February 2013
A journey from FORTRAN to C and OpenCL
You may have noticed a reduction in blog posts of late. The cause is a GPU porting project I've undertaken for theSkyNet POGS. I guess I should post something about it, in case some of you are interested.
As you may or may not know, the guts of the main POGS application is MAGPHYS. Basically, this science application loops through library files to find a best fit of different attributes for a given image pixel. The problem with the existing client is the main section of code loops through in a brute-force sequential kind of fashion. Hence, the application by default is not very "parallel" and requires re-work to parallalise and produce a successful GPU port.
We decided that converting from FORTRAN (F77) to C/C++ initially would be the best option as most of the GPU platform frameworks uses some derivation of C99. This is not to say that frameworks such as OpenCL and CUDA don't support other languages, it was just cleaner this way. Our choice of GPU framework was OpenCL.
The actual port from FORTRAN to C was fairly straight-forward, however, there were quite a few little "gotchas". This included things like: array indexing differences - FORTRAN starts at 1; floating point problems - FORTRAN does not do nearest-even rounding; and, overall output "weirdness" attributed to FORTRAN and C differences. None of these really kept me bogged down for too long. It just meant a lot of debugging and customised functions to get around them. These are temporary since the goal is to eventually move over to the C client only.
For the GPU port, it was a bit of a learning curve being the first time implementing OpenCL kernel code. I've worked with things like threading before, however, parallelising code for processing on a GPU was new to me. After hours of reading, I dove right in and started coding.
Writing the C code to prepare the OpenCL program, kernel, devices etc... and run the kernel was fairly easy. The tricky part was re-working some of the data that was going to be buffered into device memory and read back later. I decided that batching up sets of library models for the kernel threads to crunch was the best option. This essentially meant parsing the library model arrays to the device memory once and allocating space in device memory for the kernel threads to output data. At the end of the batch I would read back memory from the device and have a C based loop consolidate those results appropriately.
At present, we get a 3 - 4 time speed increase using the OpenCL implementation on modern machines with modern cards. There is a bit more work to increase that slightly by parallelizing the post batch part that accumulates output results. I find the biggest bottleneck to be reading large quantities of memory back from the device. If I can do the post batch stuff inside the device, I can reduce the amount of memory to be read back from the device before moving onto the next batch of models.
Overall, the porting process has been a great learning exercise. I'm hoping that in the next month the application can be stabilised and released to the public to crunch POGS on their GPUs. This needs approval from the project leader of course. I know there are a few more hurdles to overcome, but I'm optimistic.
Regarding my little cruncher projects (Raspberry Pi and ODROID), I will try and get back into them. I have 4 subjects coming up in Semester 1 so I'm guessing that this will drown most of my “play time”.
Thursday 14 February 2013
Pete's Blog is useful for crunching on ARM
Just wanting to plug Pete's Blog over at: http://hmastuff.com/setiathome-6.12.armv7l-unknown-linux-gnu_cubieboard
He's got a section dedicated to Raspberry Pi and has been getting BOINC running on other ARM devices like the Cubieboard. Go check it out!
He's got a section dedicated to Raspberry Pi and has been getting BOINC running on other ARM devices like the Cubieboard. Go check it out!
Saturday 9 February 2013
An ATX power option
Some of you may already know how to do this, however, if you're looking for some 5V power for your Raspberry Pis, ODROIDs, etc... Wiring up an ATX power supply is one option.
Here's some photos to illustrate how. Note, this is not a permenent solution for me. I suspect anyone doing this for something permanent would do it a lot cleaner and with a very efficient power supply. I use this for quick 12V and 5V power for testing. See this video for proper setup: http://www.youtube.com/watch?v=z2oSFpKh_Uw
Here's some photos to illustrate how. Note, this is not a permenent solution for me. I suspect anyone doing this for something permanent would do it a lot cleaner and with a very efficient power supply. I use this for quick 12V and 5V power for testing. See this video for proper setup: http://www.youtube.com/watch?v=z2oSFpKh_Uw
 |
| My 650W standby power supply with 5V 30A rail. |
 |
| Using 5V from molex connector to micro USB cable. It's soldered, I promise! Depending on your power supply you may need to draw something from the 12V circuit for it to actually work. |
 |
| Shorting pins so the PSU actually feeds power to those connectors on when you flick the power switch on the back of the PSU. |
Sunday 3 February 2013
Where's the ODROID update?
Sorry I haven't been keeping you up to date on how my ODROID-U2s have been going. I've been busy with school work, coming up to the end of my summer unit.
I've only loaded POGS on it so far to see what sort of RAC I get: http://allprojectstats.com/show.php?projekt=0&id=29095466. Around 1000. Fairly low. I've been meaning to recompile that binary and also test some other projects. Should probably load some NCI projects on there (OProject and WUProp).
I've yet to load up my second U2 with Android to give NativeBOINC a shot, but I will shortly. I will! I need to got get some correct fitting DC jacks. I'm not repeating what I did with the current one that's on and I don't wish to share it due to the dodgy levels.
In the meantime, I thought I'd post some links Ray_GTI-R has been sharing as they're quite useful. In case you don't know, he's fairly active in the community when it comes to ARM crunchers. Ray, hope you don't mind me giving you a plug.
His NativeBOINC U2s in the lead:
http://nativeboinc.org/site/host_stats#order=dcredits
5V distribution board for his gear:
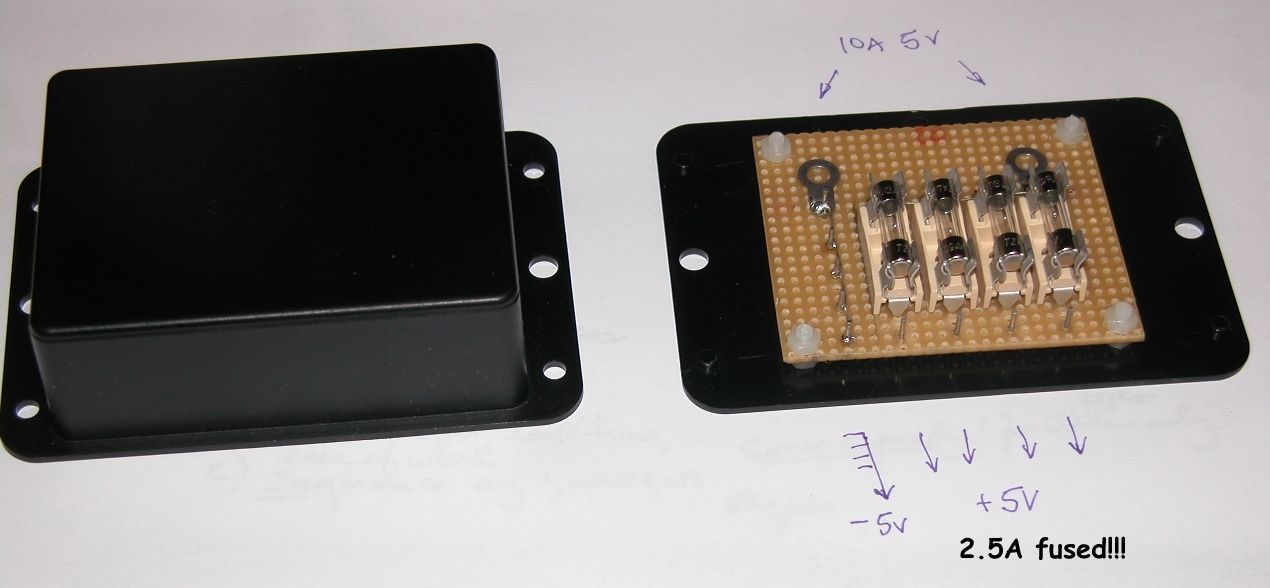
http://i65.photobucket.com/albums/h216/Ray_GTI-R/Dscn4757.jpg
Fully fused distribution board for 5V 10A PSU. Each output has a 2.5A slow-blow fuse (all Maplin items) to each ODROID.
5V power supply:
http://www.ebay.com.au/itm/110923861995 I've actually just purchased one of these!
DC jacks for U2:
Maplin L43AY
Power supply warning:
http://odroid.foros-phpbb.com/t2479-power-supply-warning
Cheers Ray for sharing your experiences with us!
I've only loaded POGS on it so far to see what sort of RAC I get: http://allprojectstats.com/show.php?projekt=0&id=29095466. Around 1000. Fairly low. I've been meaning to recompile that binary and also test some other projects. Should probably load some NCI projects on there (OProject and WUProp).
I've yet to load up my second U2 with Android to give NativeBOINC a shot, but I will shortly. I will! I need to got get some correct fitting DC jacks. I'm not repeating what I did with the current one that's on and I don't wish to share it due to the dodgy levels.
In the meantime, I thought I'd post some links Ray_GTI-R has been sharing as they're quite useful. In case you don't know, he's fairly active in the community when it comes to ARM crunchers. Ray, hope you don't mind me giving you a plug.
Ray's links
His NativeBOINC U2s in the lead:
http://nativeboinc.org/site/host_stats#order=dcredits
5V distribution board for his gear:
http://i65.photobucket.com/albums/h216/Ray_GTI-R/Dscn4757.jpg
Fully fused distribution board for 5V 10A PSU. Each output has a 2.5A slow-blow fuse (all Maplin items) to each ODROID.
5V power supply:
http://www.ebay.com.au/itm/110923861995 I've actually just purchased one of these!
DC jacks for U2:
Maplin L43AY
Power supply warning:
http://odroid.foros-phpbb.com/t2479-power-supply-warning
Cheers Ray for sharing your experiences with us!
Tuesday 29 January 2013
Albert@Home for Raspberry Pi
I just thought I'd post some recent news MarkJ over at http://markjatboinc.blogspot.com.au/ brought to my attention.
Albert@Home now has a native BRP app for ARMv6 platforms (inc Raspberry Pi). The project URL: http://albert.phys.uwm.edu
I've removed the Einstein@Home binaries I made available as I want to promote testing of this version! Also, you may find my binaries may not work soon with upcoming updates.
Albert@Home now has a native BRP app for ARMv6 platforms (inc Raspberry Pi). The project URL: http://albert.phys.uwm.edu
I've removed the Einstein@Home binaries I made available as I want to promote testing of this version! Also, you may find my binaries may not work soon with upcoming updates.
Monday 21 January 2013
Initial ODROID-U2 BOINC thoughts...
So I'm starting to build up the ODROID-U2 page. I managed to find a pre-built image of Debian "wheezy" over at http://odroid.us. This made life easier as it means I can use the same project binaries I built on the Raspberry Pi (Raspbian wheezy).
To compare the difference in performance between the Raspberry Pi and the ODROID-U2 running BOINC tasks, here's some stats:
1) Time difference between theSkyNet POGS fit task on single CPU:
Raspberry Pi @ 950 MHz ~ 120 minutes.
05:40:13 (17261): wrapper: running fit_sed (1 filters.dat observations.dat)
07:51:11 (17261): wrapper: running fit_sed (2 filters.dat observations.dat)
ODROID-U2 @ 1.7GHz ~ 30 minutes.
19:46:09 (6657): wrapper: running fit_sed (1 filters.dat observations.dat)
20:17:02 (6657): wrapper: running fit_sed (2 filters.dat observations.dat)
2) BOINC benchmark tests:
Raspberry Pi @ 950 MHz
18-Jan-2013 13:15:20 [---] 325 floating point MIPS (Whetstone) per CPU
18-Jan-2013 13:15:20 [---] 1301 integer MIPS (Dhrystone) per CPU
ODROID-U2 @ 1.7GHz
21-Jan-2013 19:39:46 [---] 969 floating point MIPS (Whetstone) per CPU
21-Jan-2013 19:39:46 [---] 3977 integer MIPS (Dhrystone) per CPU
OProject and WUProp for the Pi
Just a quick update to say OProject@Home ALX and WUProp@Home is now available for the Raspberry Pi over on my project page.
These are both NCI (Non CPU intensive) class applications, which means they'll run alongside your CPU intensive applications like SETI.
Have fun!
These are both NCI (Non CPU intensive) class applications, which means they'll run alongside your CPU intensive applications like SETI.
Have fun!
The U2 has landed
So I just received my ODROID-U2 in the mail. Eeerrr two, actually. I don't remember setting quantity to two when I ordered. More fun I guess! So here's some pictures for your perusal.
Quick specs: Quad core 1.7GHZ Cortex-A9 processor, 2GB RAM, Quad core 440MHz Mali video.
 |
| Two U2s side by side with their heatsink/cases attached. |
 |
| Up close and personal with the underside of the U2. |
 |
| Length comparison: ODROID-U2 (left) vs Raspberry Pi (right). |
Now I just need hack up some power supplies for these things (as I neglected to get one), load an OS, and power them up.
Detailed specifications: http://www.hardkernel.com/renewal_2011/products/prdt_info.php?g_code=G135341370451
Friday 18 January 2013
Updated Raspberry Pi BOINC Instructions
Just a quick one to say that I've updated the instructions at the "Raspberry Pi BOINC project" page. Have a look under the Quickstart section. It's instructions on how to attach the various BOINC projects I've provided archives for using the default BOINC client available via the Raspbian repos.
Thursday 17 January 2013
The new toy: ODROID-U2
Well I received an email from ODROID to say that my pre-ordered ODROID-U2 is now on its way. For those that aren't sure what this is, check out:
http://www.hardkernel.com/renewal_2011/products/prdt_info.php?g_code=G135341370451
I'll be doing a bit of testing with this, including loading up BOINC. I'll probably do a mix of Android and Archlinux in my tests. I've set up a new page for it that you can see over in the Pages widget. Stay tuned...
theSkyNet POGS
It's been a while since I've posted. Been busy with school and a few other things. Sorry to anyone that's been following and wondering why I went quiet.
I have some good news. I've been crunching theSkyNet POGS data on two of my Raspberry Pi's for over a month now. Detailed statistics at:
If you're interested in loading this project up, you can download the necessary files from here:
pogs-armv61.tar.gz
All you need to do is attach POGS like any old anonymous platform project and away you go. Send me a comment to let me know how you went - if you do give it a shot.
pogs-armv61.tar.gz
All you need to do is attach POGS like any old anonymous platform project and away you go. Send me a comment to let me know how you went - if you do give it a shot.
Subscribe to:
Posts (Atom)